Friday, April 27, 2012

Vanilla Cupcakes With Strawberry Swiss Meringue Buttercream


I happened to come across this recipe for Strawberry Swiss Meringue Buttercream on Pinterest from the blog "Tracey's Culinary Adventures". I had never made a Swiss Meringue Buttercream so I decided I wanted to give it a shot. It really was very simple and the end result is so light and creamy. I loved that the strawberry colors the frosting so there is no added food coloring. I decided to use the amazing buttercream on my favorite vanilla cupcake recipe. I loved these cupcakes so much that I have made them again for my baby girl's 1st birthday party.  This buttercream recipe is a keeper and I will be trying out many more Swiss Meringues in the future. 


Ingredients

1 1/2 cups fresh strawberries (8 oz.), rinsed, hulled and coarsely chopped
4 large egg whites1 1/4 cups sugar1 1/2 cups (3 sticks) unsalted butter, cut into tablespoons, at room temperature


Directions

To make the frosting: Puree the strawberries in your food processor until completely smooth.  Add the egg whites and sugar to the bowl of your stand mixer (or any heatproof bowl)  and set it over a pan of simmering water.  Heat, whisking constantly, until the sugar has dissolved - you can test with your fingertips, if the mixture feels grainy, it's not ready yet.
Attach the bowl to your stand mixer (or transfer the mixture to the bowl of a stand mixer if you used a separate bowl) fitted with the whisk attachment.  Beat on medium-high speed until stiff peaks form and the mixture has cooled to room temperature, about 10 minutes. (The bowl will be cool to the touch.) 
Reduce the mixer to medium-low speed and add the butter, 2 tablespoons at a time.  Let each addition incorporate before adding the next.  (The frosting may look soupy or curdled once you add the butter - just keep beating and it will come together.)  Scrape down the sides of the bowl with a rubber spatula, then add the strawberry puree to the bowl.  Beat until combined - the mixture will probably look curdled again when you add the strawberries, keep beating!)


Pipe the buttercream onto the cupcakes (I used a large star tip), and garnish with extra strawberries, if desired.  


Recipe originally from Martha Stewart's Cupcakes

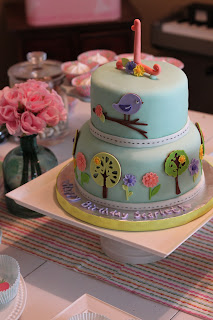
Birdie Birthday Cake- 2nd Cricut Cake


This was my second cake that I made with the help of my Cricut Cake. This cake was for a friend's little girl's first birthday and it was a total hit. All the decorations on this cake were cut out using the Cricut Cake. I learned that you have to be very patient when using the Cricut Cake and it is very time consuming but the end results are pretty amazing. There are so many shapes and designs included on each design cartridge that you can buy for the Cricut Cake that the design possibilities are endless.

Tuesday, February 28, 2012

Krystal's Smokey Red Chili


I have made chili a lot and usually is always has a bunch of chili powder in it and always has ground beef. My church was having a chili cook-off so I decided to come up with something special. I found a few recipes that used rehydrated guajilo chiles instead of the typical chili powder. I knew I wanted to use chipotle chiles in adobo because I LOVE that stuff and I wanted big chunks of meat so I planed on cutting up one of my last chuck roasts. I combined those ideas with the typical chili I usually make and it was a hit. This recipe is a keeper. I love the rich and smokey sauce and the big chucks of tender beef. My pot was one of the first to empty.

Ingredients


1 1/2 ounces dried guajilo chiles
1 or 2 chipotle chiles is adobo sauce, plus a good spoonful of the sauce
3 pound boneless beef chuck, cut into 1-inch pieces
1 tablespoon oil
1 medium onion, diced small
4 cloves garlic, minced
1 28 ounce can diced tomatoes, with juice
2 15 ounce cans pinto beans, drained and rinsed
2 15 ounce cans red kidney beans, drained and rinsed.
1 teaspoon ground cumin
1/2 teaspoon cayenne pepper
2 teaspoon dried Mexican oregano
2 tablespoons cornmeal
4 cups beef stock
2 tablespoons white vinegar


Directions


Put the guajillos in a large bowl, cover with boiling water and weight with a small plate or bowl to keep submerged. Let sit until soft, about 15 minutes. Reserve 1 cup of the liquid. Drain guajillos; discard stems and seeds. In a blender, blend guajillos, chipotle chili and sauce, and liquid until smooth. Pour mixture through a fine-mesh sieve into a bowl and discard solids. Set aside.

Cut the Chuck roast into 1-inch pieces and season with salt and pepper. Heat oil in a large Dutch oven or other heavy pot over medium-high. Cook until browned, about 5 minutes. Transfer the browned meat to a medium bowl.

Reduce heat to medium and add onion, garlic and 1/2 cup water. Cook, stirring and scraping up browned bits with a wooden spoon, until onion is translucent, about 3 minutes. Add cayenne, cumin, oregano and cornmeal and cook until fragrant, about 1 minute. Add meat, broth, chili purée, beans, tomatoes and just enough water to cover meat, if necessary; bring to a boil over high. Partially cover, reduce heat and simmer 1 hour. Uncover and cook until meat is tender and chili is slightly thickened, about 30 to 45 minutes. Add vinegar to taste.

Recipe by me.

Monday, January 30, 2012

First Cricut Cake


I got a new toy to play with the other day. It is the Cricut Cake. Many people that are familiar with the world of scrap-booking (which I am not) probably know a lot about the various Cricut machines. They are used to cut all sorts of decorative things in paper and a few other materials. A few years ago the Cricut Cake came out which is food safe and designed to cut the same decorative designs in gumpaste, fondant and really any other thin, semi-firm food material. The machine was almost $400.00 when it came out but now you can find them at outrageous discounts. I got mine on one of those discount shopping sites for $75.00. That is a price that I was willing to pay. I really enjoy creating cakes and I know I will get my money's worth. It can also be used to decorate cookies, cupcakes and more. I have also learned that a few people have switched out the blade and cutting mat and are able to cut paper just as well at the Cricuts that are designed for it. This voids the warranty I hear but it is an option. Very excited to play around with this more!

Wednesday, December 21, 2011

Bacon-Wrapped Jalapeños


Bacon-Wrapped Jalapeños are a great appetizer for the holidays or your next game day gathering. It can take some time to assemble these tasty bites but they really could not be easier. If you are pressed for time you can have them all prepped and stashed in the refrigerator just waiting to be baked off right before your hungry guests arrive. These will go really fast so doubling the recipe is a good idea but I find people will eat as many as you make so you just have to draw the line somewhere. 

Ingredients

  • 20 whole fresh Jalapeños, 2-3 inches in size
  • 2 cubes Cream Cheese, softened
  • 1/2 shredded Parmesan cheese (optional)
  • 1 pound Bacon, sliced into thirds

Directions

I suggest putting on some latex gloves while prepping the jalapeños. Cut the jalapeños in half, length-wise. With a spoon, remove the seeds and white membrane. If you want more heat left in your jalapeños you can leave some of the membrane.  Mix the Parmesan with the cream cheese if using and smear softened cheese mix into each jalapeño half. Wrap jalapeño with bacon pieces (1/3 slice). Secure by sticking toothpick through the middle.
Bake on a pan with a rack in a 375-degree oven for 20-25 minutes. After 20 minutes if bacon doesn't look brown enough, just turn on the broiler for a couple of minutes to finish it off. The jalapeños should still have some bite to it.
Serve immediately, or at room temperature.
Recipe adapted from here.

Monday, October 31, 2011

Mini Caramel Apples


Happy Halloween! I really wish I was writing this post about these yummy pumpkin cupcakes with cinnamon cream cheese frosting I made but alas, they did not last long enough for pictures. I was able to snap a photo of these mini caramel apples I made however. I was going to make these for our annual harvest party but I decided that it was just a little too much work to make a few dozen of these so I just made a few for Ryan and me. I was excited about these because you get more of the good stuff with these little suckers. They are easy and tasty but the caramel does not stick very well to the apple were the peel has been removed. I read a few things that say to add as little water to the caramel as possible but that did not seem to help much. I did dip a few in just chocolate and those held up great so if you plan on making these serve them right away or use just melted chocolate, butterscotch or peanut butter chips instead. You could also experiment with the caramel wraps that are available.

Ingredients

  • apples
  • 1 bag of caramels
  • nuts, sprinkles, melted chocolate, anything you wish to add.
  • twigs, lollipop sticks or pretzels sticks for handles
  • melon baller

Directions

Using a melon baller, scoop out little balls of apple. Add a handle of your choice and set on a piece of wax paper.

Melt the caramels in a sauce pan using as little water as possible (I only melted about 1/3 of a bag but the whole bag should make enough for 5 apples or about 35 mini apples).

Dip each mini apple into the melted caramel and turn to coat. Then dip in your extra toppings if desired and place back on the wax paper. Serve immediately.

Recipe found at From Glitter To Gumdrops

Monday, September 26, 2011

Monsters Inc Cake


My nephew's first birthday was coming up so I offered to make his birthday cake. The theme for the party was monsters so I started looking at Monsters Inc stuff for ideas. I have been playing around with fondant and had made my first cake using fondant about a month ago. I really can't stand to eat the stuff but for making creative and fun kids cakes it can't be beat. So I sketched up an idea and this is what I came up with. I have a lot to learn and it was by no means perfect. The bottom tier has a bulge from where the two cake layers meet and there was a  rip in the fondant that I was able to cover with the "Cameron" banner. For my second fondant cake I think it turned out pretty good.


All the fondant pieces are glued on with piping gel and the "Cameron" is tinted piping gel. A small batch of royal icing was used for the very top of the cake because the cream cheese frosting would not hold the shape of the decorating tip. The center of Mike, the monster was rice crispy treats.


My sister made a very cute personal sized smash cake just for Cameron that was a healthier option. Except for the royal icing and rice crispy treats, all of the recipes I used for the Monsters Inc cake and his smash cake can all be found below.


Beatty's Chocolate Cake
From Ina Garten of the Food Network
Butter, for greasing the pans
1 3/4 cups all-purpose flour, a little more for pans
2 cups sugar
3/4 cups good cocoa powder
2 teaspoons baking soda
1 teaspoon baking powder
1 teaspoon salt
1 cup buttermilk, shaken
1/2 cup vegetable oil
2 extra-large eggs, at room temperature
1 teaspoon pure vanilla extract
1 cup freshly brewed hot coffee
Chocolate Buttercream, recipe follows
Directions:


Preheat the oven to 350 degrees F. Butter two 8-inch x 2-inch round cake pans. Line with parchment paper, then butter and flour the pans.


Sift the flour, sugar, cocoa, baking soda, baking powder, and salt into the bowl of an electric mixer fitted with a paddle attachment and mix on low speed until combined. In another bowl, combine the buttermilk, oil, eggs, and vanilla. With the mixer on low speed, slowly add the wet ingredients to the dry. With mixer still on low, add the coffee and stir just to combine, scraping the bottom of the bowl with a rubber spatula. Pour the batter into the prepared pans and bake for 35 to 40 minutes, until a cake tester comes out clean. Cool in the pans for 30 minutes, then turn them out onto a cooling rack and cool completely.


Place 1 layer, flat side up, on a flat plate or cake pedestal. With a knife or offset spatula, spread the top with frosting. Place the second layer on top, rounded side up, and spread the frosting evenly on the top and sides of the cake.


Chocolate Frosting:
(used this as the filling for the cake)
6 ounces good semisweet chocolate
1/2 pound (2 sticks) unsalted butter, at room temperature
1 extra-large egg yolk, at room temperature
1 teaspoon pure vanilla extract
1 1/4 cups sifted confectioners' sugar
1 tablespoon instant coffee powder


Directions:
Chop the chocolate and place it in a heat-proof bowl set over a pan of simmering water. Stir until just melted and set aside until cooled to room temperature.


In the bowl of an electric mixer fitted with a paddle attachment, beat the butter on medium-high speed until light yellow and fluffy, about 3 minutes. Add the egg yolk and vanilla and continue beating for 3 minutes. Turn the mixer to low, gradually add the confectioners' sugar, then beat at medium speed, scraping down the bowl as necessary, until smooth and creamy. Dissolve the coffee powder in 2 teaspoons of the hottest tap water. On low speed, add the chocolate and coffee to the butter mixture and mix until blended. Don't whip! Spread immediately on the cooled cake.


Orange Cream Cheese Frosting:

Adapted from this frosting recipe by Dorie Greenspan.

(this frosting is what covered the whole cake)

8 ounces cream cheese, at room temperature
1 stick unsalted butter, at room temperature
1 pound (3 3/4 cups) confectioners' sugar
1 tablespoon orange juice 
1/2 teaspoon pure orange extract (or to taste)


Directions:

Working with a stand mixer filled with a paddle attachment, beat the cream cheese and butter together until smooth and creamy. Gradually add the sugar and continue to beat until the frosting is velvety smooth. Beat in the lemon juice or extract. If you wish, add coconut to half of the frosting.
Recipe and instructions for making  Marshmallow Fondant can be found here

Healthy Smash Cake:

From wholesomebabyfood.com
Makes 1 double-layer 9-inch square cake; adapted from "What to Expect"
2 1/2 cups thinly sliced carrots
2 1/2 cups apple juice concentrate (you may use slightly less)
1 1/2 cups raisins
Vegetable Spray/Shortening
2 cups whole-wheat flour
1/2 cup vegetable oil
2 whole eggs
4 egg whites
1 tablespoon vanilla extract
3/4 cup unsweetened applesauce
1/2 cup wheat germ
2 Tbsp low sodium baking powder
1 Tbsp ground cinnamon

Directions:
Prep: Preheat oven to 350 F. Line two 9 inch square cake pans with waxed paper and spray the paper with vegetable spray/shortening.

Combine the carrots with 1 cup plus 2 tablespoons of the juice concentrate in a medium size saucepan.

Bring to a boil, then lower the heat and simmer, covered, until carrots are tender, 15 to 20 mins. Puree in a blender of food processor until smooth.
Add the raisins and process until finely chopped. Let mixture cool.
Combine the flour, wheat germ, baking powder, and cinnamon in a large mixing bowl. Add 1 1/4 cups juice concentrate, the oil, eggs, egg whites, and vanilla; beat just until well mixed. Fold in the carrot puree and applesauce. Pour the batter into the prepared cake pans.
Bake until a knife inserted in the center comes out clean, 35 to 40 mins. Cool briefly in the pans, then turn out onto wire racks to cool completely. When cool, frost with Cream Cheese Frosting below or sprinkle a wee bit of powdered sugar if desired.


Whipped Cream Frosting
Makes  frosting for a 2 layer cake
1 (8 ounce) package cream
cheese, softened
1 cup powder sugar
1/8 teaspoon salt
1 teaspoon vanilla extract
1 1/2 cups heavy cream

Directions:
In a large bowl, beat cream cheese, sugar salt and vanilla until smooth. In a small bowl, whip the heavy cream until stiff peaks form. Fold into the cream cheese mixture.
Locations of visitors to this page