Showing posts with label dessert. Show all posts

Friday, April 27, 2012

Vanilla Cupcakes With Strawberry Swiss Meringue Buttercream


I happened to come across this recipe for Strawberry Swiss Meringue Buttercream on Pinterest from the blog "Tracey's Culinary Adventures". I had never made a Swiss Meringue Buttercream so I decided I wanted to give it a shot. It really was very simple and the end result is so light and creamy. I loved that the strawberry colors the frosting so there is no added food coloring. I decided to use the amazing buttercream on my favorite vanilla cupcake recipe. I loved these cupcakes so much that I have made them again for my baby girl's 1st birthday party.  This buttercream recipe is a keeper and I will be trying out many more Swiss Meringues in the future. 


Ingredients

1 1/2 cups fresh strawberries (8 oz.), rinsed, hulled and coarsely chopped
4 large egg whites1 1/4 cups sugar1 1/2 cups (3 sticks) unsalted butter, cut into tablespoons, at room temperature


Directions

To make the frosting: Puree the strawberries in your food processor until completely smooth.  Add the egg whites and sugar to the bowl of your stand mixer (or any heatproof bowl)  and set it over a pan of simmering water.  Heat, whisking constantly, until the sugar has dissolved - you can test with your fingertips, if the mixture feels grainy, it's not ready yet.
Attach the bowl to your stand mixer (or transfer the mixture to the bowl of a stand mixer if you used a separate bowl) fitted with the whisk attachment.  Beat on medium-high speed until stiff peaks form and the mixture has cooled to room temperature, about 10 minutes. (The bowl will be cool to the touch.) 
Reduce the mixer to medium-low speed and add the butter, 2 tablespoons at a time.  Let each addition incorporate before adding the next.  (The frosting may look soupy or curdled once you add the butter - just keep beating and it will come together.)  Scrape down the sides of the bowl with a rubber spatula, then add the strawberry puree to the bowl.  Beat until combined - the mixture will probably look curdled again when you add the strawberries, keep beating!)


Pipe the buttercream onto the cupcakes (I used a large star tip), and garnish with extra strawberries, if desired.  


Recipe originally from Martha Stewart's Cupcakes

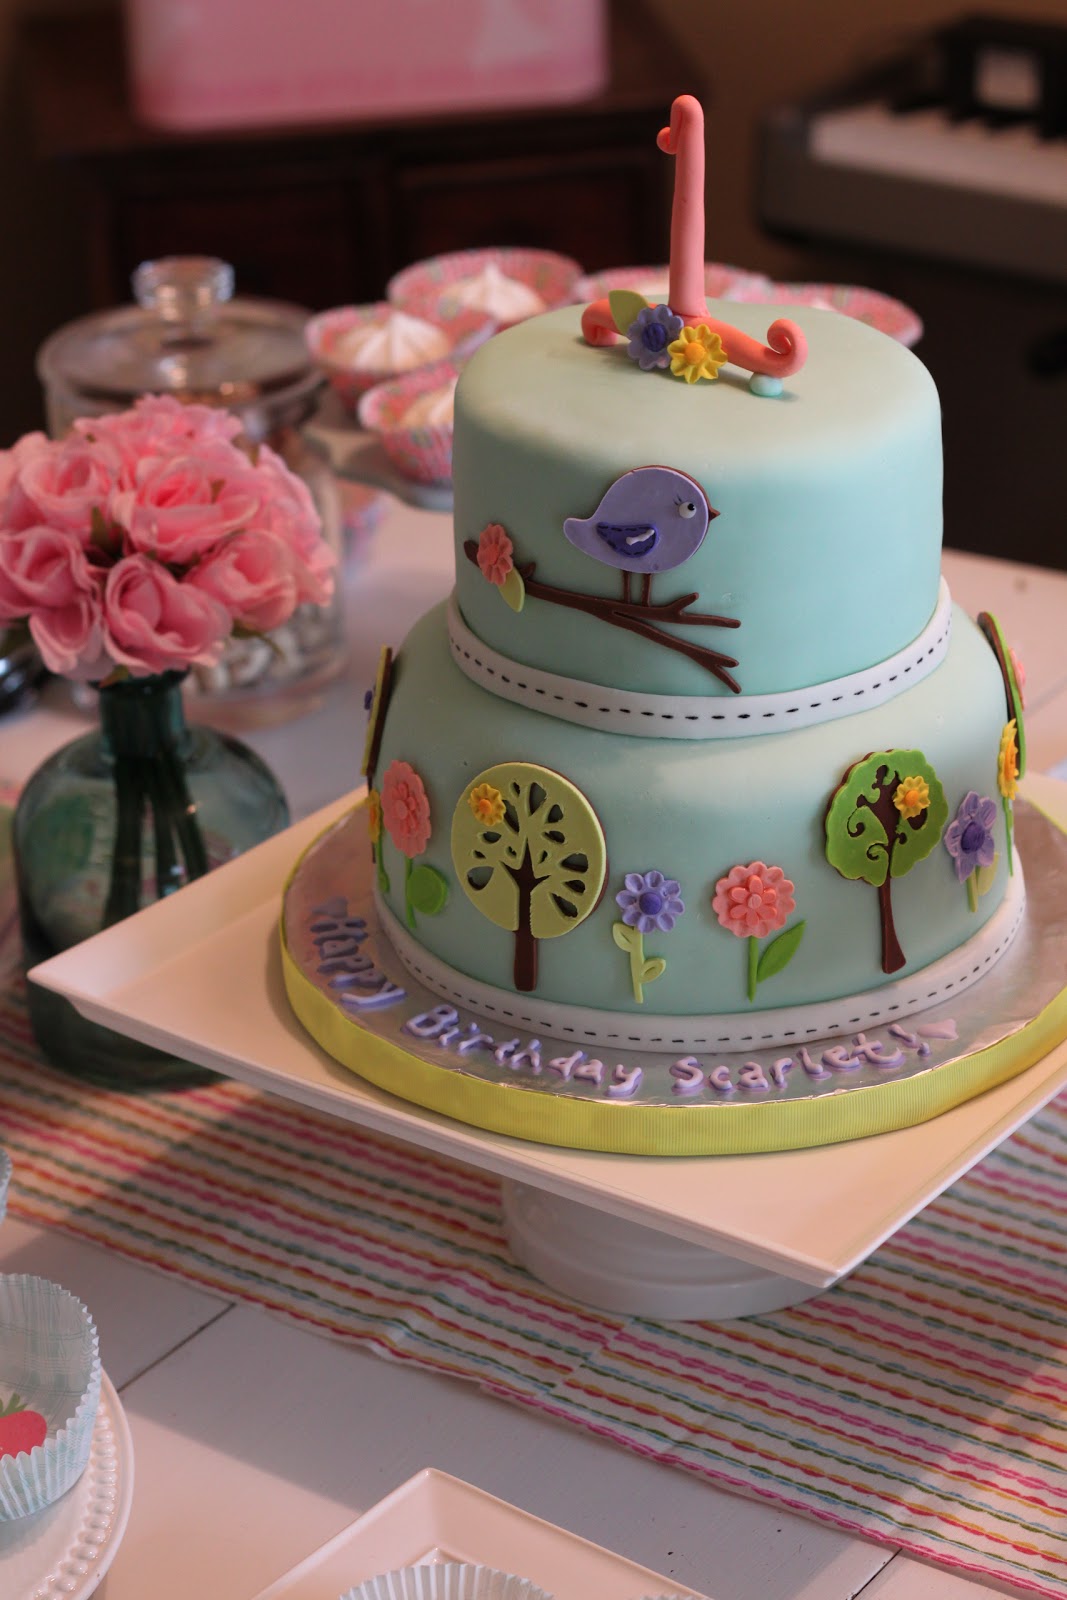
Birdie Birthday Cake- 2nd Cricut Cake


This was my second cake that I made with the help of my Cricut Cake. This cake was for a friend's little girl's first birthday and it was a total hit. All the decorations on this cake were cut out using the Cricut Cake. I learned that you have to be very patient when using the Cricut Cake and it is very time consuming but the end results are pretty amazing. There are so many shapes and designs included on each design cartridge that you can buy for the Cricut Cake that the design possibilities are endless.

Monday, October 31, 2011

Mini Caramel Apples


Happy Halloween! I really wish I was writing this post about these yummy pumpkin cupcakes with cinnamon cream cheese frosting I made but alas, they did not last long enough for pictures. I was able to snap a photo of these mini caramel apples I made however. I was going to make these for our annual harvest party but I decided that it was just a little too much work to make a few dozen of these so I just made a few for Ryan and me. I was excited about these because you get more of the good stuff with these little suckers. They are easy and tasty but the caramel does not stick very well to the apple were the peel has been removed. I read a few things that say to add as little water to the caramel as possible but that did not seem to help much. I did dip a few in just chocolate and those held up great so if you plan on making these serve them right away or use just melted chocolate, butterscotch or peanut butter chips instead. You could also experiment with the caramel wraps that are available.

Ingredients

  • apples
  • 1 bag of caramels
  • nuts, sprinkles, melted chocolate, anything you wish to add.
  • twigs, lollipop sticks or pretzels sticks for handles
  • melon baller

Directions

Using a melon baller, scoop out little balls of apple. Add a handle of your choice and set on a piece of wax paper.

Melt the caramels in a sauce pan using as little water as possible (I only melted about 1/3 of a bag but the whole bag should make enough for 5 apples or about 35 mini apples).

Dip each mini apple into the melted caramel and turn to coat. Then dip in your extra toppings if desired and place back on the wax paper. Serve immediately.

Recipe found at From Glitter To Gumdrops

Monday, September 26, 2011

Monsters Inc Cake


My nephew's first birthday was coming up so I offered to make his birthday cake. The theme for the party was monsters so I started looking at Monsters Inc stuff for ideas. I have been playing around with fondant and had made my first cake using fondant about a month ago. I really can't stand to eat the stuff but for making creative and fun kids cakes it can't be beat. So I sketched up an idea and this is what I came up with. I have a lot to learn and it was by no means perfect. The bottom tier has a bulge from where the two cake layers meet and there was a  rip in the fondant that I was able to cover with the "Cameron" banner. For my second fondant cake I think it turned out pretty good.


All the fondant pieces are glued on with piping gel and the "Cameron" is tinted piping gel. A small batch of royal icing was used for the very top of the cake because the cream cheese frosting would not hold the shape of the decorating tip. The center of Mike, the monster was rice crispy treats.


My sister made a very cute personal sized smash cake just for Cameron that was a healthier option. Except for the royal icing and rice crispy treats, all of the recipes I used for the Monsters Inc cake and his smash cake can all be found below.


Beatty's Chocolate Cake
From Ina Garten of the Food Network
Butter, for greasing the pans
1 3/4 cups all-purpose flour, a little more for pans
2 cups sugar
3/4 cups good cocoa powder
2 teaspoons baking soda
1 teaspoon baking powder
1 teaspoon salt
1 cup buttermilk, shaken
1/2 cup vegetable oil
2 extra-large eggs, at room temperature
1 teaspoon pure vanilla extract
1 cup freshly brewed hot coffee
Chocolate Buttercream, recipe follows
Directions:


Preheat the oven to 350 degrees F. Butter two 8-inch x 2-inch round cake pans. Line with parchment paper, then butter and flour the pans.


Sift the flour, sugar, cocoa, baking soda, baking powder, and salt into the bowl of an electric mixer fitted with a paddle attachment and mix on low speed until combined. In another bowl, combine the buttermilk, oil, eggs, and vanilla. With the mixer on low speed, slowly add the wet ingredients to the dry. With mixer still on low, add the coffee and stir just to combine, scraping the bottom of the bowl with a rubber spatula. Pour the batter into the prepared pans and bake for 35 to 40 minutes, until a cake tester comes out clean. Cool in the pans for 30 minutes, then turn them out onto a cooling rack and cool completely.


Place 1 layer, flat side up, on a flat plate or cake pedestal. With a knife or offset spatula, spread the top with frosting. Place the second layer on top, rounded side up, and spread the frosting evenly on the top and sides of the cake.


Chocolate Frosting:
(used this as the filling for the cake)
6 ounces good semisweet chocolate
1/2 pound (2 sticks) unsalted butter, at room temperature
1 extra-large egg yolk, at room temperature
1 teaspoon pure vanilla extract
1 1/4 cups sifted confectioners' sugar
1 tablespoon instant coffee powder


Directions:
Chop the chocolate and place it in a heat-proof bowl set over a pan of simmering water. Stir until just melted and set aside until cooled to room temperature.


In the bowl of an electric mixer fitted with a paddle attachment, beat the butter on medium-high speed until light yellow and fluffy, about 3 minutes. Add the egg yolk and vanilla and continue beating for 3 minutes. Turn the mixer to low, gradually add the confectioners' sugar, then beat at medium speed, scraping down the bowl as necessary, until smooth and creamy. Dissolve the coffee powder in 2 teaspoons of the hottest tap water. On low speed, add the chocolate and coffee to the butter mixture and mix until blended. Don't whip! Spread immediately on the cooled cake.


Orange Cream Cheese Frosting:

Adapted from this frosting recipe by Dorie Greenspan.

(this frosting is what covered the whole cake)

8 ounces cream cheese, at room temperature
1 stick unsalted butter, at room temperature
1 pound (3 3/4 cups) confectioners' sugar
1 tablespoon orange juice 
1/2 teaspoon pure orange extract (or to taste)


Directions:

Working with a stand mixer filled with a paddle attachment, beat the cream cheese and butter together until smooth and creamy. Gradually add the sugar and continue to beat until the frosting is velvety smooth. Beat in the lemon juice or extract. If you wish, add coconut to half of the frosting.
Recipe and instructions for making  Marshmallow Fondant can be found here

Healthy Smash Cake:

From wholesomebabyfood.com
Makes 1 double-layer 9-inch square cake; adapted from "What to Expect"
2 1/2 cups thinly sliced carrots
2 1/2 cups apple juice concentrate (you may use slightly less)
1 1/2 cups raisins
Vegetable Spray/Shortening
2 cups whole-wheat flour
1/2 cup vegetable oil
2 whole eggs
4 egg whites
1 tablespoon vanilla extract
3/4 cup unsweetened applesauce
1/2 cup wheat germ
2 Tbsp low sodium baking powder
1 Tbsp ground cinnamon

Directions:
Prep: Preheat oven to 350 F. Line two 9 inch square cake pans with waxed paper and spray the paper with vegetable spray/shortening.

Combine the carrots with 1 cup plus 2 tablespoons of the juice concentrate in a medium size saucepan.

Bring to a boil, then lower the heat and simmer, covered, until carrots are tender, 15 to 20 mins. Puree in a blender of food processor until smooth.
Add the raisins and process until finely chopped. Let mixture cool.
Combine the flour, wheat germ, baking powder, and cinnamon in a large mixing bowl. Add 1 1/4 cups juice concentrate, the oil, eggs, egg whites, and vanilla; beat just until well mixed. Fold in the carrot puree and applesauce. Pour the batter into the prepared cake pans.
Bake until a knife inserted in the center comes out clean, 35 to 40 mins. Cool briefly in the pans, then turn out onto wire racks to cool completely. When cool, frost with Cream Cheese Frosting below or sprinkle a wee bit of powdered sugar if desired.


Whipped Cream Frosting
Makes  frosting for a 2 layer cake
1 (8 ounce) package cream
cheese, softened
1 cup powder sugar
1/8 teaspoon salt
1 teaspoon vanilla extract
1 1/2 cups heavy cream

Directions:
In a large bowl, beat cream cheese, sugar salt and vanilla until smooth. In a small bowl, whip the heavy cream until stiff peaks form. Fold into the cream cheese mixture.

Blackberry Crumb Breakfast Bars


Our summer in the Pacific Northwest was less than stellar. Everything in the garden is so behind and even the blackberries seem to be quite late this year. For the last few weeks I kept checking the blackberry patch but all I found was hard, green little berries. This past week they are finally ripe. So I put Baby Girl in her carrier and picked as many ripe berries as I could find. We have used up all our homemade jam so that was the first use the berries were going towards. I did end up with a couple of extra pints of berries and I had recently repined these amazing looking raspberry breakfast bars on Pinterest that were featured on the Smitten Kitchen.  It was the perfect time to make one of the recipes I had pined because then I could link up with the Pinterest Challenge that a new mommy friend of mine, the wonderful Subfertile Frugalista is hosting.


These bars are fantastic. Best breakfast bar I have tasted but that is probably because they really belong more in the bar cookie category than a breakfast bar. Don't let the term breakfast trick you into thinking these are healthy. They are less sweet than a typical dessert of this type which I really like. I used whole wheat pastry flour to bump up the nutritional value a bit. I think this recipe is perfect as it is for a treat but I think I could easily give it a healthy overhaul to make it truly a breakfast bar. Add even less sugar, reduce the amount of flour by adding flax and ground nuts and we would be getting close. I feel an experiment coming on.   


Ingredients 

For the crust and crumb:
1 1/2 cups whole wheat pastry flour (original recipe calls for all-purpose)
1 cup firmly packed dark brown sugar
1 1/4 cups rolled oats
3/4 teaspoon salt
3/4 teaspoon baking powder
1/2 teaspoon baking soda
1/2 teaspoon cinnamon
3/4 cup (1 1/2 sticks) unsalted butter, cut into 1-inch pieces
For the raspberry filling:
1/4 cup firmly packed dark brown sugar
1 tablespoon grated lemon zest
1/2 teaspoon cinnamon
2 tablespoons all-purpose flour
1 pound Blackberries, fresh or frozen (original recipe calls for raspberries)
1/4 cup fresh lemon juice
2 tablespoons unsalted butter, melted and cooled

Directions

Make the crust and crumb: Preheat the oven to 350°F. Butter the bottom and sides of a 9-by-13-inch glass or light-colored metal baking pan. Put a long piece of parchment paper in the bottom of the pan, letting the parchment extend up the two short sides of the pan and overhang slightly on both ends. (This will make it easy to remove the bars from the pan after they have baked.) Butter the parchment.


Put the flour, brown sugar, oats, salt, baking powder, baking soda, and cinnamon in a food processor. Pulse in short bursts until combined. Add the butter and pulse until loose crumbs form.


Reserve 1 1/2 cup of the mixture and set aside. (Note: The book suggests you reserve one cup only.) Pour the rest of the mixture into the prepared pan and use your hands or the back of a large wooden spoon to push the crust into an even layer at the bottom of the pan. The crust should touch the sides of the pan. Bake until golden brown, 12 to 15 minutes. Transfer to a wire rack and let the crust cool. Keep the oven on while you make the raspberry filling.


Make the berry filling: In a medium bowl, whisk the sugar, lemon zest, cinnamon and flour together. Add the berries, lemon juice and butter and use your hands to toss gently until the raspberries are evenly coated.


Assemble and bake the bars: Spread the berry filling evenly on top of the cooled crust. Sprinkle the reserved crust mixture evenly on top of the filling.
Bake for 35 to 45 minutes, rotating the pan every 15 minutes, until the top is golden brown and the filling starts to bubble around the edges.


Transfer to a wire rack to cool completely, then cut into squares and serve. The bars can be stored in the refrigerator in an airtight container for up to two days.


Recipe from Smitten Kitchen adapted from Baked: New Frontiers in Baking

Monday, May 30, 2011

Lemon Curd Cupcakes

An online friend of mine made this amazing lemon cake last week. It looked so good that I knew I just had to make something with lemon cake and curd. Fortunately, it was Memorial Day weekend and Ryan, baby girl and I were going for a day trip to visit with college friends so I had a good reason to make lemony treats. I came across this recipe for Lemon Curd Cupcakes that sounded amazing. The cupcakes are filled with lemon curd and topped with a mountain of frosting that is made up of cream cheese, whipped cream and lemon curd. Everyone really enjoyed these cupcakes. The cake was moist, the curd tart and the frosting was deliciously light and refreshing.

Short on time?
Jazzing up a vanilla box cake mix with lemon zest and lemon extract is a great option and you can find lemon curd in the baking isle with the other canned pie fillings.


**Update**
I now prefer to make the cupcakes using Billy's Vanilla, Vanilla Cupcake recipe. I just add the lemon vest and extract and only 1 teaspoon of vanilla. This makes for an even more moist cupcake. The recipe makes about 36 cupcakes so I make a batch and a half of the frosting recipe and I double the lemon curd recipe. 
            Cupcakes using the Billy's Vanilla cupcake recipe.
Lemon Cake:
3 C flour
1 Tbsp baking powder
1/2 tsp salt
1 C unsalted butter (room temperature)
2 C sugar
4 eggs (separated)
1 C milk
1 tsp vanilla
1 tsp lemon extract
zest of two lemons
Mix together flour, baking powder and salt.
Beat together the butter and sugar until light and fluffy. Add egg yolks, one at a time. Mix well. Alternately add in flour mixture and milk. Beginning and ending with flour. Add in vanilla and lemon and lemon zest.
In another bowl, beat the egg whites until stiff but not dry. Add egg whites into batter, folding gently.
Place into cupcake liners. Bake at 350 for about 20-25 minutes or until toothpick comes out clean. Cool. Use half of lemon curd recipe to fill the cupcakes by cutting a small hole in the middle of the cupcake and filling with lemon curd (I made a double batch of curd and used it all).
Lemon Curd:
** I made a double batch because I wanted a very generous about of filling.**
2 lemons
4 egg yolks
3/4 C sugar
4 Tbsp butter, cold
Zest the lemons. Juice the lemons. In a bowl mix together the egg yolks and sugar until smooth. Stir in lemon juice and zest.
In a saucepan, over medium heat, bring to a simmer. Continue cooking, stirring constantly until the mixture coats the back of a spoon. Stir in the butter 1 Tbsp at a time. Cover lemon curd with plastic wrap and refrigerate until chilled and thickened.
Lemon Cream Cheese Frosting
1 8 oz. pkg cream cheese, softened
1 C sugar
1/8 tsp salt
1 tsp vanilla
1 1/2 C whipping cream
Half of the above lemon curd recipe above.
In a small bowl beat whipping cream until stiff. In another bowl, mix together the cream cheese, sugar, salt and vanilla. Add in lemon curd. Beat until smooth. Fold in whipped cream. Generously frost the cupcakes.

Tuesday, February 8, 2011

Chocolate Coconut Milk Ice Cream

Chocolate ice cream is one of my favorite things on Earth. I have been making my own ice cream since Ryan and I received an ice cream maker for a wedding gift. Usually it takes a little time to make homemade ice cream but not with this amazingly delicious and easy recipe. This rich ice cream is made from coconut milk so perfect for those avoiding diary. The simple list of ingredients are always in my pantry so it is a perfect recipe to have as a quick "go to". I think the ice cream is best when it has firmed up for a hour or two after churning. It does get pretty hard when left in the freezer but if put out to thaw for a a bit, the texture once again becomes creamy and not at all icy. You can successfully make a half batch of this recipe as well. The taste and texture of this ice cream is very nice and is just as good if not better than the expensive Purely Decadent Coconut Milk Ice Cream that I have tried (Sells for about $4.99/pint).

Ingredients
3 cups of unsweetened coconut milk (about two cans)
2/3 cup of cocoa powder

6 tablespoons agave syrup (I often use honey instead of agave)

1 teaspoon vanilla extract

Directions
Whisk cocoa powder in a small amount of coconut milk, until smooth. Then add the rest of the ingredients and whisk until well combined. Or dump all ingredients together and blend with a stick blender (this is the method I prefer). Make according to your machines instructions.

Monday, December 20, 2010

Chocolate Peppermint Cupcakes


I stumbled upon this recipe for chocolate cupcakes with peppermint cupcakes and I just knew I had to make them. They were the perfect thing to bring to our Christmas gathering for my husband's side of the family. I only followed the icing recipe because I love the chocolate cake recipe that I make so much that I just don't gamble with trying a new one that may not be as good.


Use Beatty's Chocolate Cake recipe for the cupcakes. The recipe will me 24 cupcakes. Reduce the baking time to 20-25 minutes.

Ingredients

• 2 C butter, softened
• 5-7 C powdered sugar, divided
• 3-4 T milk
• 4 t peppermint extract

6 peppermint candy canes (or a couples handfuls of small peppermint candies)


Directions

In the bowl of an electric mixer, add the butter and beat until fluffy. Slowly add the powdered sugar one cup at a time and beat until smooth. Add the milk and peppermint extract and beat on high until the frosting is very smooth.

Place 3 of the candy canes in a food processor and process until the candy becomes a fine powder. Fold the candy cane dust into the icing.

Once the cupcakes are cooled, pipe large swirls of frosting on top of the cupcakes.

Take the 3 remaining candy canes and put them in a plastic baggy and crush into medium sized chunks. Finally sprinkle candy chunks on top of the frosted cupcakes.

Recipe adapted from Pip & Ebby.

Wednesday, December 15, 2010

Russian Tea Cakes


These are one of the easiest and tastiest cookies I make around the Holidays. They are buttery and just melt in your mouth. I love that there are very few ingredients and it really is a no fuss cookie. There is no chilling or shaping or frosting. The most difficult task asked in this recipe is sifting the powder sugar and flour but if I am using my awesome beater blade I honestly don't even bother with any sifting. So if you are in the mood to make some Holiday cookies but want something fast and easy, I highly recommended Russian Tea Cakes or Mexican Weddings Cakes as they are also called. They also keep well so they are great to put in goody baskets.

Ingredients

  • 1 cup unsalted butter, at room temperature
  • 2 teaspoons vanilla extract
  • 1/2 cup sifted confectioners’ sugar, plus more for rolling cookies
  • 2 cups flour
  • 1/4 teaspoon salt
  • 1 cup finely chopped pecans or walnuts (I like pecans)

Directions

Preheat the oven to 325 degrees F.

Cream butter in a large mixing bowl. Add the vanilla then gradually add the 1/2 cup confectioners' sugar, beating until light and fluffy. Sift the flour, measure, then sift again with the salt. Add gradually to the butter mixture. Add the pecans and mix well.

Shape the dough into 1-inch balls and place 2 inches apart on ungreased baking sheets. Bake for 20 minutes, or until edges are very lightly browned. Remove the cookies from the baking sheets and roll in powdered sugar while still hot. Cool on wire racks and roll cookies again in powdered sugar before serving.

Once they are completely cooled, cookies may be stored in airtight containers for up to 1 week.


Recipe by Emeril Lagasse of the Food Network

Thursday, November 11, 2010

Apple-Spice Layer Cake with Caramel Swirl Icing


It was once again time for me to bake something to be auctioned off at our Church's annual auction for the local food bank. Because the auction was in late October, I wanted something that screamed fall. At first I was just going to make a pumpkin cheesecake. I LOVE pumpkin cheesecake but I have made that many times before so I decide to look around a bit and see what new yummy fall dessert I could find. Boy did I find one. I of course had to test the recipe out before making it for the auction so I made it and brought it over to my parents' house and had my family sample and give me their opinion. We all loved it so I knew Apple-Spice Layer Cake with Caramel Swirl Icing was the one. The apples make the cake so moist and it has just the right amount of spice. The cake is also very impressive with the caramel and pecans not to mention it is huge. I unfortunately was not able to attend the auction so I don't know how much money the cake raised but I did hear from many at the table that purchase it and it got nothing but good reviews.


Ingredients
  • 3 sticks unsalted butter at room temperature
  • 3 cups sugar
  • 2 Tbs molasses
  • 6 large eggs
  • 3 cups cake flour
  • 1 1/4 tsp baking soda
  • 1/4 tsp kosher salt
  • 2 Tbs ground cinnamon
  • 2 tsp ground allspice
  • 1 tsp ground nutmeg
  • 1 tsp ground ginger
  • 1 cup sour cream
  • 3 granny smith apples, peeled and shredded (1 1/2-2 cups)
  • 1 Tbs vanilla extract
  • 1 Tbs fresh minced ginger (optional)
Icing
  • 1 1/2-2 cups caramel topping (I used Hershey's brand)
  • 3 sticks butter, at room temperature
  • 2 Tbs heavy cream
  • 1 tsp vanilla extract
  • 3 cups powdered sugar
  • 1 cup (8 ounces) cream cheese (original recipe called for mascarpone)
  • 2 cups pecan pieces, toasted (optional)
Directions

Place one oven rack in the bottom third of the oven and place a second in the top third. Preheat the oven to 350. Grease 3 9-inch cake pans, then line each one with a parchment paper round and grease the rounds.

In a stand mixer fitted with a paddle attachment, cream the butter and sugar on medium-high until light and fluffy, about 3 minutes. Beat in the molasses, and scrape down the sides of the mixing bowl. Add the eggs one at at a time, beating well after each egg. In a medium bowl, sift together the four, baking soda, salt, and ground spices. Add the sour cream and flour mixture alternately to the batter, starting and ending with the flour mixture (flour in 3 increments, sour cream in 2 increments). Stir in the shredded apples, vanilla, and fresh ginger.

The batter will be thick, so use a spoon to transfer evenly into the three pans. Place 2 of the pans side by side on one rack, and the third on the other rack. Make sure they are staggered so that no layer is directly under or above another. Bake 35-40 minutes, rearranging the layers about halfway through, until firm to the touch. Monitor the layers carefully, as they may be ready at different times.

Remove from the oven and allow to cool in the pans for 10 minutes. Run a knife around the edges and carefully unmold the cakes to a cooling rack. Cool completely before icing.

To make the icing, cream the butter on medium-high speed for about 3 minutes, until fluffy and pale. Add the powdered sugar over low speed until combined, then add the cream cheese, cream and vanilla. Increase speed to medium-high and beat until fluffy, about 3 minutes.

Reserve about 1/4-1/3 cup of the caramel, then stir the remaining caramel into the frosting, using large strokes to create swirls throughout.

Place 1 cake layer on a serving plate or decorating stand, and spread a layer of icing on top. Top with the second cake, then repeat with more icing, then the final layer. Cover the cake with an even layer of frosting. Pat the toasted pecans onto the sides of the cake, then decorate the top as you desire. Drizzle the remaining caramel over the top.

Original recipe from Rebecca Rather, The Pastry Queen Christmas. Recipe adapted from Pink Parsley.

Wednesday, October 6, 2010

Single Serving Pear-Maple Cobbler


Sometimes you just need something sweet. For me, this often happens when Ryan is at work and it is just me home alone for the evening. Why?? Because I'm bored. I don't keep ice cream or cookies in the house so when I want a treat I have to make it from scratch. So instead of making a big batch of something sinful, I have started coming up with some single serving desserts that will satisfy my craving but not totally wreck my whole week of healthy eating.

This pear-maple cobbler is a perfect dessert on a fall evening and is a very generous serving so one could share, but I don't recommended it! And if you wanted to make it even more indulgent, I'm sure ice cream or whipped cream would make this even better.


Ingredients

Cobbler Filling
  • 1 pear, peeled, cored, and chopped
  • 1/8 cup pure maple syrup
  • 1 Tbs all-purpose flour
  • pinch salt
  • dash vanilla extract
  • pinch ground nutmeg
  • pinch ground cinnamon
  • 1 pat butter
Cobbler Topping
  • 1/4 cup all-purpose flour
  • a little less that 1/2 tsp baking powder
  • pinch salt
  • pinch ground cinnamon
  • 1 1/2 Tbs chilled unsalted butter, cut into cubes
  • 1 Tbs whole milk
  • 1 Tbs maple syrup
  • dash vanilla extract
  • 1 tsp sugar
Directions

Preheat the oven to 425. Combine the pear, maple syrup, four, salt, vanilla, cinnamon and nutmeg in a bowl. Stir well place in a ramekin and top with one pat of butter. Bake until heated through and bubbly, about 18-20 minutes.

To make the topping, combine the flour, baking powder, salt and chilled butter into a bowl and using a fork, cut the butter into the mixture until well combined. Combine cinnamon, and sugar in a small bowl and set aside. Melt 2 tablespoons of the butter and set aside. Add the milk, maple syrup, and vanilla, and stir until just combined. Drop by spoonfuls over the warm pear filling and sprinkle with the reserved sugar mixture.

Bake 14 minutes, until golden-brown and firm to the touch. Serve warm.

Recipe by me.

Friday, September 3, 2010

Jungle Animal Cupcakes


I don't have a recipe to share but thought I would post these fun jungle animal cupcakes my sister and I made for my brother's baby shower. We used this tutorial I found on YouTube but changed the monkey up a bit, made some fun owls just because and I did one special butterfly cupcake for my Grandma's 80th birthday (which was also the day of the shower). The cupcakes
were a lot of fun to make and they were liked by all.


Monday, July 12, 2010

Flag Cupcakes

I hope everyone had a good 4th of July. My husband had to work so I thought I would make a big batch of festive cupcakes for him to bring to the fire station and a batch to bring to the family BBQ. I was searching for inspiration when I came across this blog. Kellyn is a girl after my own heart! Right there on her "about me" section of her blog she says " I don't believe in sweets that are made to look pretty but don't taste good! ". I say AMEN to that. That is exactly why I refused to have fondant on my wedding cake. These cupcakes look very impressive but are very light and they sure do taste great. I love using whip cream as a frosting. I'm not a huge frosting fan unless it is chocolate or cream cheese so this was perfect and reminiscent of shortcake. I do have one warning on these bad boys, serves these on a plate with a folk or they will be all over you and your guests!!!


Ingredients

Makes about 17 cupcakes

For the cupcakes:
1 recipe of your favorite yellow cake or 1 package of yellow cake mix
1 package of fresh blueberries
1 package of fresh raspberries
Whipped cream frosting and filling:
4 cups of heavy whipping cream (might need to make this in two batches, it makes a lot)
1/3 cup of sugar
3 tsp of almond extract
Raspberry Drizzle:
1 (12 oz) package of frozen raspberries thawed and drained, juice reserved
1/4 cup of white sugar
2 tablespoons cornstarch
2 tablespoons of raspberry liqueur (I did not have any so don't worry if you don't)

Directions
  • Preheat you oven to 350 and center your rack.
  • Mix the cake batter according to directions.
  • Line your cupcake tray with liners and fill 3/4 of the way to the top so that when baked you get a nice domed top that is high enough to cut off and use later for tops.
  • Bake for about 15-18 min. Cool completely on a rack, once cooled carefully cut the top of each cupcake off using a serrated knife.
  • While the cupcakes are cooling make your raspberry sauce. Add enough water to reserved raspberry juice to measure 1 cup (make sure you do this otherwise it will be way to thick in the end) Stir together sugar and cornstarch in a 1-quart saucepan. Stir in juice and raspberries.
  • Heat to boiling over medium heat. Boil and stir 1 min; strain out the seeds and let cool completely, your done. If you want you can add the liqueur after you strain it.
  • In a stand mixer fixed with the whisk attachment, whisk together your whipped cream ingredients - cream, sugar, and almond extract until stiff peaks form. About 2-3 min.
  • In a pastry bag fitted with a small round tip fill with about a quarter of the whipped cream mixture and insert into the center of the cupcake bottoms to fill the centers with cream.
  • In a larger pastry bag fitted with a large round tip put a layer of frosting on the top of the cut cupcakes. Place a small handful of blueberries on top of the cream layer on each cupcake.
  • Put your cupcake tops back on top of the blueberry cream layer. Using the rest of the whipped cream frosting pipe a mound of whipped cream on top of it as high as you want.
  • Put the raspberry drizzle in a ziplock bag and cut a tiny tip off and drizzle that way. Top each one off with a fresh raspberry and your done!
Recipe from K Bakes.
Locations of visitors to this page